# Flux 架构
Flux是由一群Facebook工程师提出的,它的名字是拉丁语的Flow。Flux的提出主要是针对现有前端MVC框架的局限总结出来的一套基于dispatcher的前端应用架构模式。按照MVC的命名习惯,他应该叫ADSV(Action Dispatcher Store View)。
Flux的核心思想就是数据和逻辑永远单向流动。
# Flux 是什么?
Flux是一种架构思想,专门是用来解决软件的结构问题。它跟MVC架构是同一类东西,但是更加简单和清晰。Flux存在多种实现(至少24种)react是其中的一种,react本身只设计UI层,如果搭建大型应用,必须搭配一个前端框架。
Flux将一个应用分成四个部分
View:视图层。Action(动作):视图层发出消息(比如click),它主要包含一个actionType属性(说明动作的类型)和一些其他属性(用来传递数据)Dispatcher(派发器):用来接收Action,将 Action 派发到 Store,并执行回调函数,Dispatcher 只能有一个,而且是全局的。store(数据层):负责保存数据,并定义修改数据的逻辑,同时调用dispatcher的register方法将自己注册称为一个监听器。这样每当我们使用dispatcher的dispatch方法分发一个action时,store注册的监听器就会被调用,同时得到这个action作为参数。简单点说:就是用来存放应用的状态,根据 action 的 type 字段来确定是否响应这个 action。若需要响应,则会根据 action中的信息修改 store 中的数据,并触发一个更新事件,去更新页面。
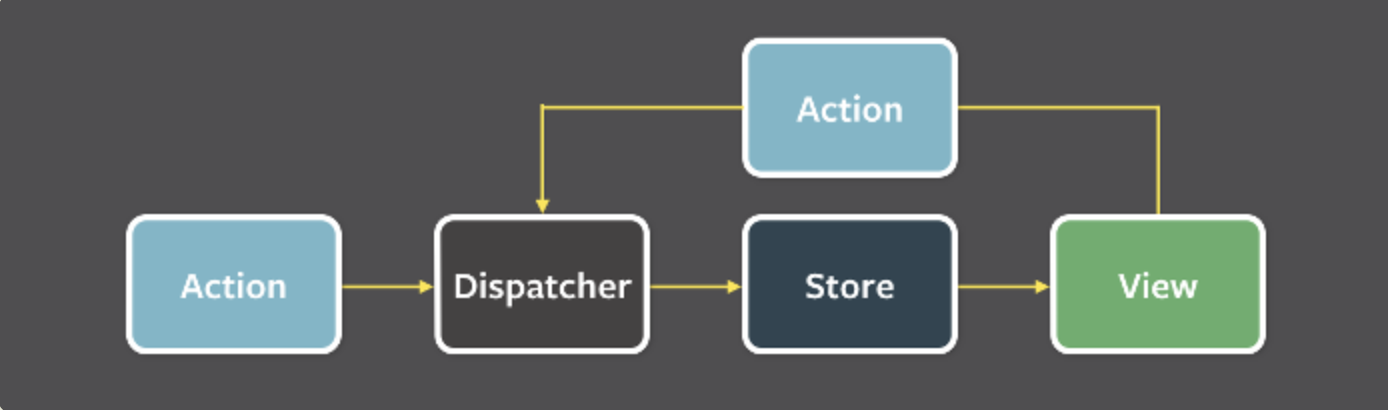 从上图可以看出
在Flux应用中,数据从action到dispatcher,再到store,最终到view的路线是单向不可逆的,各个角色之间不会像前端MVC模式那样存在交错的连线。
# 单向流动
Flux 的最大特点,就是数据的"单向流动"。
- 用户访问 View
View发出用户的ActionDispatcher收到Action,要求Store进行相应的更新,即dispatcher负责分发事件Store更新后,发出一个"change"事件,即Store是负责保存数据,同时响应事件并更新数据View收到"change"事件后,更新页面,简单点说就是View负责订阅store中的数据,并使用这些数据渲染相应的页面。
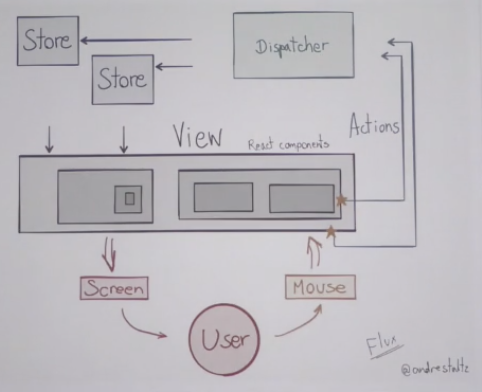
数据总是"单向流动",任何相邻的部分都不会发生数据的"双向流动"。这保证了流程的清晰
# 补充
Dispatcher的主要API:register(function callback):注册callback回调。unregister(string id):卸载回调方法。waitFor(array<string> ids):在继续执行当前回调之前,等待指定要调用的回调,这个方法只能被回调用于响应分派的有效载荷。dispatch(object payload): 将有效载荷调度到所有注册的回调。isDispatching():Dispatcher是否正在派发任务。
# 例子
View(第一部分) 请打开 Demo 的首页index.jsx ,你会看到只加载了一个组件。
// index.jsx
var React = require('react');
var ReactDOM = require('react-dom');
var MyButtonController = require('./components/MyButtonController');

ReactDOM.render(
  <MyButtonController/>,
  document.querySelector('#example')
);
2
3
4
5
6
7
8
9
上面代码中,你可能注意到了,组件的名字不是 MyButton,而是 MyButtonController。这是为什么?
这里,我采用的是 React 的 controller view 模式。"controller view"组件只用来保存状态,然后将其转发给子组件。MyButtonController的源码很简单。
// components/MyButtonController.jsx
var React = require('react');
var ButtonActions = require('../actions/ButtonActions');
var MyButton = require('./MyButton');

var MyButtonController = React.createClass({
  createNewItem: function (event) {
    ButtonActions.addNewItem('new item');
  },

  render: function() {
    return <MyButton
      onClick={this.createNewItem}
    />;
  }
});

module.exports = MyButtonController;
2
3
4
5
6
7
8
9
10
11
12
13
14
15
16
17
18
上面代码中,MyButtonController将参数传给子组件MyButton。后者的源码甚至更简单。
// components/MyButton.jsx
var React = require('react');

var MyButton = function(props) {
  return <div>
    <button onClick={props.onClick}>New Item</button>
  </div>;
};

module.exports = MyButton;
2
3
4
5
6
7
8
9
10
上面代码中,你可以看到MyButton是一个纯组件(即不含有任何状态),从而方便了测试和复用。这就是"controll view"模式的最大优点。
MyButton只有一个逻辑,就是一旦用户点击,就调用this.createNewItem 方法,向Dispatcher发出一个Action。
// components/MyButtonController.jsx

  // ...
  createNewItem: function (event) {
    ButtonActions.addNewItem('new item');
  }
2
3
4
5
6
上面代码中,调用createNewItem方法,会触发名为addNewItem的Action。
Action
每个Action都是一个对象,包含一个actionType属性(说明动作的类型)和一些其他属性(用来传递数据)。
在这个Demo里面,ButtonActions 对象用于存放所有的Action。
// actions/ButtonActions.js
var AppDispatcher = require('../dispatcher/AppDispatcher');

var ButtonActions = {
  addNewItem: function (text) {
    AppDispatcher.dispatch({
      actionType: 'ADD_NEW_ITEM',
      text: text
    });
  },
};
2
3
4
5
6
7
8
9
10
11
上面代码中,ButtonActions.addNewItem方法使用AppDispatcher,把动作ADD_NEW_ITEM派发到Store。
Dispatcher
Dispatcher的作用是将Action派发到Store。你可以把它看作一个路由器,负责在View和Store之间,建立Action的正确传递路线。注意,Dispatcher只能有一个,而且是全局的。
Facebook官方的 Dispatcher 实现输出一个类,你要写一个AppDispatcher.js,生成 Dispatcher 实例。
// dispatcher/AppDispatcher.js
var Dispatcher = require('flux').Dispatcher;
module.exports = new Dispatcher();
AppDispatcher.register()方法用来登记各种Action的回调函数。


// dispatcher/AppDispatcher.js
var ListStore = require('../stores/ListStore');

AppDispatcher.register(function (action) {
  switch(action.actionType) {
    case 'ADD_NEW_ITEM':
      ListStore.addNewItemHandler(action.text);
      ListStore.emitChange();
      break;
    default:
      // no op
  }
})
2
3
4
5
6
7
8
9
10
11
12
13
14
15
16
17
18
19
上面代码中,Dispatcher收到ADD_NEW_ITEM动作,就会执行回调函数,对ListStore进行操作。
记住,Dispatcher 只用来派发 Action,不应该有其他逻辑。
Store
Store保存整个应用的状态。它的角色有点像MVC架构之中的Model。
在我们的 Demo 中,有一个ListStore,所有数据都存放在那里。
// stores/ListStore.js
var ListStore = {
  items: [],

  getAll: function() {
    return this.items;
  },

  addNewItemHandler: function (text) {
    this.items.push(text);
  },

  emitChange: function () {
    this.emit('change');
  }
};

module.exports = ListStore;
2
3
4
5
6
7
8
9
10
11
12
13
14
15
16
17
18
上面代码中,ListStore.items用来保存条目,ListStore.getAll()用来读取所有条目,ListStore.emitChange()用来发出一个"change"事件。
由于 Store 需要在变动后向 View 发送"change"事件,因此它必须实现事件接口。
// stores/ListStore.js
var EventEmitter = require('events').EventEmitter;
var assign = require('object-assign');

var ListStore = assign({}, EventEmitter.prototype, {
  items: [],

  getAll: function () {
    return this.items;
  },

  addNewItemHandler: function (text) {
    this.items.push(text);
  },

  emitChange: function () {
    this.emit('change');
  },

  addChangeListener: function(callback) {
    this.on('change', callback);
  },

  removeChangeListener: function(callback) {
    this.removeListener('change', callback);
  }
});
2
3
4
5
6
7
8
9
10
11
12
13
14
15
16
17
18
19
20
21
22
23
24
25
26
27
上面代码中,ListStore继承了EventEmitter.prototype,因此就能使用ListStore.on()和ListStore.emit(),来监听和触发事件了。
Store 更新后 this.addNewItemHandler() 发出事件 this.emitChange(),表明状态已经改变。 View 监听到这个事件,就可以查询新的状态,更新页面了。
View (第二部分) 现在,我们再回过头来修改
View,让它监听Store的change事件。
// components/MyButtonController.jsx
var React = require('react');
var ListStore = require('../stores/ListStore');
var ButtonActions = require('../actions/ButtonActions');
var MyButton = require('./MyButton');

var MyButtonController = React.createClass({
  getInitialState: function () {
    return {
      items: ListStore.getAll()
    };
  },

  componentDidMount: function() {
    ListStore.addChangeListener(this._onChange);
  },

  componentWillUnmount: function() {
    ListStore.removeChangeListener(this._onChange);
  },

  _onChange: function () {
    this.setState({
      items: ListStore.getAll()
    });
  },

  createNewItem: function (event) {
    ButtonActions.addNewItem('new item');
  },

  render: function() {
    return <MyButton
      items={this.state.items}
      onClick={this.createNewItem}
    />;
  }
});
2
3
4
5
6
7
8
9
10
11
12
13
14
15
16
17
18
19
20
21
22
23
24
25
26
27
28
29
30
31
32
33
34
35
36
37
38
上面代码中,你可以看到当MyButtonController 发现 Store 发出 change 事件,就会调用 this._onChange 更新组件状态,从而触发重新渲染。
// components/MyButton.jsx
var React = require('react');

var MyButton = function(props) {
  var items = props.items;
  var itemHtml = items.map(function (listItem, i) {
    return <li key={i}>{listItem}</li>;
  });

  return <div>
    <ul>{itemHtml}</ul>
    <button onClick={props.onClick}>New Item</button>
  </div>;
};

module.exports = MyButton;
2
3
4
5
6
7
8
9
10
11
12
13
14
15
16
参考:http://www.ruanyifeng.com/blog/2016/01/flux.html