# VueRouter
Table of Contents generated with DocToc (opens new window)
# 什么是路由
对于没有后端项目经验或者SPA项目来说,路由可能会比较陌生。这里的路由不是指硬件路由,也不是我们通常所说的网络协议中的路由,但是它们表达的思想都是一样的,就是路径和资源的识别。
我们先来看访问一个网站,假如我们访问这三个页面:
http://sports.sina.com.cn/nba/
http://sports.sina.com.cn/tennis/
http://sports.sina.com.cn/csl/
那么其路径就分别是 /nba,/tennis,/csl
当用户使用http://sports.sina.com.cn/nba/来访问该页面时,Web 服务会接收到这个请求,然后会解析 URI 中的路径 /nba,在 Web 服务的程序中,该路径对应着相应的处理逻辑,程序会把请求交给路径所对应的处理逻辑,这样就完成了一次「路由分发」,这个分发就是通过「路由」来完成的。
# 前端路由
随着前端技术的发展,现在很多web应用都采用了SPA的形式,之前是通过服务端根据 url 的不同返回不同的页面实现无法满足需求,所以这里需要把不同路由对应不同的内容或页面的任务交给前端来做。通过这种前端路由实现的单页面应用有好也有坏。
好处:
1、良好的前后端分离。SPA和RESTful架构一起使用,后端不再负责模板渲染、输出页面工作,web前端和各种移动终端地位对等,后端API通用化。
2、用户体验好、快,内容的改变不需要重新加载整个页面,web应用更具响应性和更令人着迷
3、同一套后端程序代码,不用修改就可以用于Web界面、手机、平板等多种客户端
缺点
1、不利于SEO。
2、初次加载耗时相对增多。
3、导航不可用,如果一定要导航需要自行实现前进、后退。
# 路由原理
在解析源码前,先来了解下前端路由的实现原理。 前端路由实现起来其实很简单,本质就是监听 URL 的变化,然后匹配路由规则,显示相应的页面,并且无须刷新。目前单页面使用的路由就只有两种实现方式
- hash 模式
- history 模式
# hash 模式
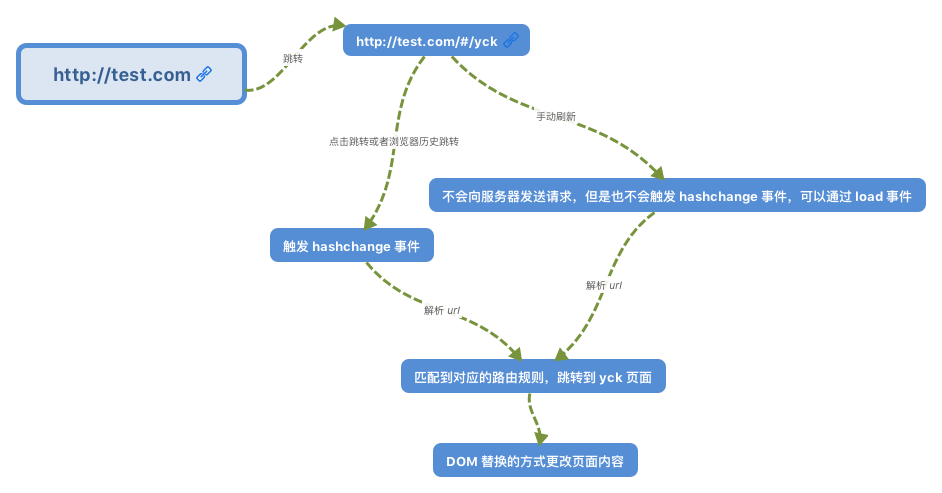
在HTML5的 history API 出现之前,前端的路由都是通过 hash 来实现的,hash 能兼容低版本的浏览器。当 url 的 hash 发生变化时,触发 hashchange 注册的回调,回调中去进行不同的操作,进行不同的内容的展示。
www.test.com/##/ 就是 Hash URL,当 ## 后面的哈希值发生变化时,不会向服务器请求数据,然后通过 hashchange 事件来监听到 URL 的变化,从而进行跳转页面。
//一个小例子
<!DOCTYPE html>
<html>
  <head>
    <meta charset="utf-8">
    <title>路由</title>
  </head>
  <body>
     <ul>
        <li><a href="#/">默认路由</a></li>
        <li><a href="#/router1">路由1</a></li>
        <li><a href="#/router2">路由2</a></li>
    </ul>
    <div id="content"></div>
  </body>
  <script type="text/javascript">
    class Router{
       constructor(routes = {}) {
            this.routes = routes;
            this.curUrl = "";
        }
        route(path,callback){
          this.routes[path] = callback || function(){
          }
        }
        refresh(){
          this.curUrl = location.hash.slice(1) || '/';
          if(this.routes[this.curUrl]){
            this.routes[this.curUrl]();
          }else{
            console.log('路由没有注册');
          }
        }
        init(){
           window.addEventListener('load', this.refresh.bind(this), false);
           window.addEventListener('hashchange', this.refresh.bind(this), false);
        }
    }

    function changeContent(text){
      document.getElementById('content').innerHTML = text;
    }
    let router = new Router({
      '/' : function(){
        changeContent('默认路由');
      },
      '/router1':function(){
        changeContent('路由1');
      }
    })

    router.route('/router2',function(){
      changeContent('路由2');
    })

    router.init();
  </script>
</html>
2
3
4
5
6
7
8
9
10
11
12
13
14
15
16
17
18
19
20
21
22
23
24
25
26
27
28
29
30
31
32
33
34
35
36
37
38
39
40
41
42
43
44
45
46
47
48
49
50
51
52
53
54
55
56
57
58
# HTML5 history API路由实现
History 模式是 HTML5 新推出的功能,html5 增加了两个方法,分别是pushState,replaceState,比之 Hash URL 更加美观
pushState和replaceState是用来手动插入历史记录,然后执行AJAX请求,而popstate就是当浏览器前进后退的时候获得相应的state再执行相应操作
<!DOCTYPE html>
<html lang="en">
<head>
    <meta charset="UTF-8">
    <title>History Roter</title>
</head>
<body>
    <ul>
        <li><a href="#/">默认路由</a></li>
        <li><a href="#/router1">路由1</a></li>
        <li><a type="replace" href="#/router2">路由2</a></li>
    </ul>
    <div id="content"></div>
    <script>
    class Router {
       constructor(routes = {}) {
            this.routes = routes;
            this.curUrl = "";
        }
        notify(state){
          this.curUrl = state.path || '/';
          if(this.routes[this.curUrl]){
            this.routes[this.curUrl]();
          }else{
            console.log('路由没有注册');
          }
        }
        route(path,callback){
          this.routes[path] = callback || function(){

          }
        }
        init(){
          let that = this;
          //浏览器点击前进后退时触发的事件
           window.addEventListener('popstate',function(event){
              that.notify(event.state || {})
           }, false);

           //监控页面A标签,跳转做处理
           document.querySelector('body').addEventListener('click', function(event){
            if(event.target.tagName === 'A'){
              let link = event.target.getAttribute('href');
              if(!/^http/.test(link)){
                event.preventDefault();
                let path = link.slice(1) || '/';
                that.notify({ 'path' : path} || {})
                if(event.target.getAttribute('type') == 'replace'){
                  history.replaceState({ 'path' : path},'',event.target.href);
                }else{
                  history.pushState({ 'path' : path},'',event.target.href);
                }
              }
            }
           }, false)

           //首次进入页面进行路由
          let path = location.hash.slice(1) || '/';
          that.notify({ 'path' : path} || {})
        }
    }

    function changeContent(text){
      document.getElementById('content').innerHTML = text;
    }
    let router = new Router({
      '/' : function(){
        changeContent('默认路由');
      },
      '/router1':function(){
        changeContent('路由1');
      }
    })

    router.route('/router2',function(){
      changeContent('路由2');
    })

    router.init();
    </script>
</body>

</html>
2
3
4
5
6
7
8
9
10
11
12
13
14
15
16
17
18
19
20
21
22
23
24
25
26
27
28
29
30
31
32
33
34
35
36
37
38
39
40
41
42
43
44
45
46
47
48
49
50
51
52
53
54
55
56
57
58
59
60
61
62
63
64
65
66
67
68
69
70
71
72
73
74
75
76
77
78
79
80
81
82
83

# VueRouter 源码解析
# 源码目录

这里,先大概说明一下各个文件的作用,下面会详细讲解
components下是两个组件<router-view> and <router-link>的实现
history是路由方式的封装
util下主要是各种功能类和功能函数
create-matcher和create-router-map的作用是生成匹配表
index是整个插件的入口
Install 提供安装的方法
# 路由注册
利用 Vue.js 提供的插件机制 .use(plugin) 来安装 VueRouter,而这个插件机制则会调用该 plugin 对象的 install 方法
这里我们先分析注册vueRouter类的两个文件 src/index.js 和src/install.js
Index文件主要暴露了一个vueRouter类
export default class VueRouter {


  constructor (options: RouterOptions = {}) {
    .....
  }
   //初始化函数
  init (app: any /* Vue component instance */) {

    this.apps.push(app)

    // main app already initialized.

    if (this.app) {
      return
    }
    //初次初始化,即首次进入页面路由指定展示
    this.app = app

    const history = this.history

    if (history instanceof HTML5History) {
      history.transitionTo(history.getCurrentLocation())
    } else if (history instanceof HashHistory) {
      //建立hash监控
      const setupHashListener = () => {
        history.setupListeners()
      }
      history.transitionTo(
        history.getCurrentLocation(),
        setupHashListener,
        setupHashListener
      )
    }

    history.listen(route => {
      this.apps.forEach((app) => {
        app._route = route
      })
    })
  }
}

VueRouter.install = install
VueRouter.version = '__VERSION__'

//在外部直接引用vue-router,自动使用插件
if (inBrowser && window.Vue) {
  window.Vue.use(VueRouter)
}
2
3
4
5
6
7
8
9
10
11
12
13
14
15
16
17
18
19
20
21
22
23
24
25
26
27
28
29
30
31
32
33
34
35
36
37
38
39
40
41
42
43
44
45
46
47
48
49
50
# 插件安装
这里是vue插件的经典写法,给插件对象增加 install 方法用来安装插件具体逻辑,同时在最后判断下如果是在浏览器环境且存在 window.Vue 的话就会自动使用插件。
接下来,我们从 install 看 vue 如何安装插件
import View from './components/view'
import Link from './components/link'

export let _Vue

export function install(Vue) {
    if (install.installed) return
    install.installed = true
    //私有化vue,方便引入
    _Vue = Vue

    const isDef = v => v !== undefined

    const registerInstance = (vm, callVal) => {
        let i = vm.$options._parentVnode
        if (isDef(i) && isDef(i = i.data) && isDef(i = i.registerRouteInstance)) {
            i(vm, callVal)
        }
    }

    Vue.mixin({
        beforeCreate() {
            //首次进入初始化路由
            if (isDef(this.$options.router)) {
                //根组件指向自己
                this._routerRoot = this
                this._router = this.$options.router
                    //初次进入对页面进行路由
                this._router.init(this)
                    //监控 router数据变化,这里为更新router-view
                Vue.util.defineReactive(this, '_route', this._router.history.current)
            } else {
                //为每个组件传递根组件,方便访问router信息
                this._routerRoot = (this.$parent && this.$parent._routerRoot) || this
            }
            registerInstance(this, this)
        },
        destroyed() {
            registerInstance(this)
        }
    })

    /**router访问的是根组件的router对象,就是传入的router**/
    Object.defineProperty(Vue.prototype, '$router', {
        get() { return this._routerRoot._router }
    })

    /**route访问的是根组件的router对象,就是传入的route**/
    Object.defineProperty(Vue.prototype, '$route', {
            get() { return this._routerRoot._route }
        })
        //注册router-view和router-link组件
    Vue.component('router-view', View)
    Vue.component('router-link', Link)

    const strats = Vue.config.optionMergeStrategies

        // 对路由钩子使用相同的钩子合并策略
    strats.beforeRouteEnter = strats.beforeRouteLeave = strats.beforeRouteUpdate = strats.created
}
2
3
4
5
6
7
8
9
10
11
12
13
14
15
16
17
18
19
20
21
22
23
24
25
26
27
28
29
30
31
32
33
34
35
36
37
38
39
40
41
42
43
44
45
46
47
48
49
50
51
52
53
54
55
56
57
58
59
60
install做了以下操作
1、对所有vue实例混入
beforeCreate操作,设置_routerRoot向上传递指向根组件,根组件设置router对象2、根组件首次进入的时候,初始化路由,将router对象挂载到根组件元素
_router上,并且设置劫持数据_route3、通过给
Vue.prototype定义$router、$route属性把他们注入到所有组件中(主要是为了方便访问router,route)4、注册两个组件
router-view和router-link
# 创建 router 实例
在使用的实例中,我们看到安装完插件后,会实例一个router对象,把路由配置的数组作为参数传入,并且将其传入vue实例的options中。接下来我们看VueRouter类的作用。VueRouter在index.js文件中
export default class VueRouter {
  static install: () => void;
  static version: string;

  app: any;
  apps: Array<any>;
  ready: boolean;
  readyCbs: Array<Function>;
  options: RouterOptions;
  mode: string;
  history: HashHistory | HTML5History | AbstractHistory;
  matcher: Matcher;
  fallback: boolean;
  beforeHooks: Array<?NavigationGuard>;
  resolveHooks: Array<?NavigationGuard>;
  afterHooks: Array<?AfterNavigationHook>;

  constructor (options: RouterOptions = {}) {
    this.app = null
    this.apps = []
    this.options = options
    this.beforeHooks = []
    this.resolveHooks = []
    this.afterHooks = []
    this.matcher = createMatcher(options.routes || [], this) //生成匹配表

    /*路由模式***/
    let mode = options.mode || 'hash'
    /**兼容低版本不支持history模式*/
    this.fallback = mode === 'history' && !supportsPushState && options.fallback !== false
    if (this.fallback) {
      mode = 'hash'
    }
    /**非浏览器***/
    if (!inBrowser) {
      mode = 'abstract'
    }
    this.mode = mode

    /**门面模式封装history***/

    switch (mode) {
      case 'history':
        this.history = new HTML5History(this, options.base)
        break
      case 'hash':
        this.history = new HashHistory(this, options.base, this.fallback)
        break
      case 'abstract':
        this.history = new AbstractHistory(this, options.base)
        break
      default:
        if (process.env.NODE_ENV !== 'production') {
          assert(false, `invalid mode: ${mode}`)
        }
    }
  }
2
3
4
5
6
7
8
9
10
11
12
13
14
15
16
17
18
19
20
21
22
23
24
25
26
27
28
29
30
31
32
33
34
35
36
37
38
39
40
41
42
43
44
45
46
47
48
49
50
51
52
53
54
55
56
57
这里可以看到构造函数中有一步操作
this.matcher = createMatcher(options.routes || [], this)
将传入的 routes 配置数组处理为 mather 属性的值,顺藤摸瓜,我们去 createMatcher 创建的文件 src/create-matcher.js 文件中看他到底做了什么操作。
# 创建匹配器
export function createMatcher (
  routes: Array<RouteConfig>,
  router: VueRouter
): Matcher {
  const { pathList, pathMap, nameMap } = createRouteMap(routes) //生成routermap表

  function addRoutes (routes) {
    createRouteMap(routes, pathList, pathMap, nameMap)
  }

  function match (
    raw: RawLocation,
    currentRoute?: Route,
    redirectedFrom?: Location
  ): Route {
    const location = normalizeLocation(raw, currentRoute, false, router)
    const { name } = location

    if (name) {
      const record = nameMap[name]
      if (process.env.NODE_ENV !== 'production') {
        warn(record, `Route with name '${name}' does not exist`)
      }
      if (!record) return _createRoute(null, location)
      const paramNames = record.regex.keys
        .filter(key => !key.optional)
        .map(key => key.name)

      if (typeof location.params !== 'object') {
        location.params = {}
      }

      if (currentRoute && typeof currentRoute.params === 'object') {
        for (const key in currentRoute.params) {
          if (!(key in location.params) && paramNames.indexOf(key) > -1) {
            location.params[key] = currentRoute.params[key]
          }
        }
      }

      if (record) {
        location.path = fillParams(record.path, location.params, `named route "${name}"`)
        return _createRoute(record, location, redirectedFrom)
      }
    } else if (location.path) {
      location.params = {}
      for (let i = 0; i < pathList.length; i++) {
        const path = pathList[i]
        const record = pathMap[path]
        if (matchRoute(record.regex, location.path, location.params)) {
          return _createRoute(record, location, redirectedFrom)
        }
      }
    }
    // no match
    return _createRoute(null, location)
  }

  function redirect (
    record: RouteRecord,
    location: Location
  ): Route {
   //*****
  }

  function alias (
    record: RouteRecord,
    location: Location,
    matchAs: string
  ): Route {
   //*********
  }

  function _createRoute (
    record: ?RouteRecord,
    location: Location,
    redirectedFrom?: Location
  ): Route {
    //************
  }

  return {
    match,
    addRoutes
  }
}
2
3
4
5
6
7
8
9
10
11
12
13
14
15
16
17
18
19
20
21
22
23
24
25
26
27
28
29
30
31
32
33
34
35
36
37
38
39
40
41
42
43
44
45
46
47
48
49
50
51
52
53
54
55
56
57
58
59
60
61
62
63
64
65
66
67
68
69
70
71
72
73
74
75
76
77
78
79
80
81
82
83
84
85
86
在代码中,我们看到了createMatcher再一次将routes配置数组传给了createRouteMap进一步处理
根据代码分析createMatcher就是根据传入的routes生成路由map对应表,并且返回match函数以及一个可以增加路由配置项addRoutes函数,向上传递给VueRouter类暴露的接口addRoutes。
我们继续来看src/create-route-map.js下的createRouteMap如何生成map表的
# 如何生成map表
export function createRouteMap (
  routes: Array<RouteConfig>,
  oldPathList?: Array<string>,
  oldPathMap?: Dictionary<RouteRecord>,
  oldNameMap?: Dictionary<RouteRecord>
): {
  pathList: Array<string>;
  pathMap: Dictionary<RouteRecord>;
  nameMap: Dictionary<RouteRecord>;
} {
  // 路径列表用于控制路径匹配优先级
  const pathList: Array<string> = oldPathList || []  //路径列表
  const pathMap: Dictionary<RouteRecord> = oldPathMap || Object.create(null) //path路由map
  const nameMap: Dictionary<RouteRecord> = oldNameMap || Object.create(null) //名字路由map

  routes.forEach(route => {
    addRouteRecord(pathList, pathMap, nameMap, route)
  })

  //确保通配符总是在最后
  // ensure wildcard routes are always at the end
  for (let i = 0, l = pathList.length; i < l; i++) {
    if (pathList[i] === '*') {
      pathList.push(pathList.splice(i, 1)[0])
      l--
      i--
    }
  }

  return {
    pathList,
    pathMap,
    nameMap
  }
}

function addRouteRecord (
  pathList: Array<string>,
  pathMap: Dictionary<RouteRecord>,
  nameMap: Dictionary<RouteRecord>,
  route: RouteConfig,
  parent?: RouteRecord,
  matchAs?: string
) {
  const { path, name } = route
  if (process.env.NODE_ENV !== 'production') {
    assert(path != null, `"path" is required in a route configuration.`)
    assert(
      typeof route.component !== 'string',
      `route config "component" for path: ${String(path || name)} cannot be a ` +
      `string id. Use an actual component instead.`
    )
  }

  const pathToRegexpOptions: PathToRegexpOptions = route.pathToRegexpOptions || {}
  const normalizedPath = normalizePath(
    path,
    parent,
    pathToRegexpOptions.strict
  )

  if (typeof route.caseSensitive === 'boolean') {
    pathToRegexpOptions.sensitive = route.caseSensitive
  }

  //封装route记录
  const record: RouteRecord = {
    path: normalizedPath, //路径
    regex: compileRouteRegex(normalizedPath, pathToRegexpOptions), //转化为匹配数组
    components: route.components || { default: route.component }, //关联组件
    instances: {}, //实例
    name, //名字
    parent, //父级router
    matchAs,
    redirect: route.redirect, //跳转
    beforeEnter: route.beforeEnter, //进入前操作
    meta: route.meta || {}, //附加参数
    props: route.props == null  //props属性
      ? {}
      : route.components
        ? route.props
        : { default: route.props }
  }

  //子路由
  if (route.children) {

    //子路由收集
    route.children.forEach(child => {
      const childMatchAs = matchAs
        ? cleanPath(`${matchAs}/${child.path}`)
        : undefined
      addRouteRecord(pathList, pathMap, nameMap, child, record, childMatchAs)
    })
  }

  //别名
  if (route.alias !== undefined) {
    const aliases = Array.isArray(route.alias)
      ? route.alias
      : [route.alias]

    aliases.forEach(alias => {
      const aliasRoute = {
        path: alias,
        children: route.children
      }
      addRouteRecord(
        pathList,
        pathMap,
        nameMap,
        aliasRoute,
        parent,
        record.path || '/' // matchAs
      )
    })
  }

  //存储。按路径存储
  if (!pathMap[record.path]) {
    pathList.push(record.path)
    pathMap[record.path] = record
  }

  //按名字存储
  if (name) {
    if (!nameMap[name]) {
      nameMap[name] = record
    } else if (process.env.NODE_ENV !== 'production' && !matchAs) {
      warn(
        false,
        `Duplicate named routes definition: ` +
        `{ name: "${name}", path: "${record.path}" }`
      )
    }
  }
}
2
3
4
5
6
7
8
9
10
11
12
13
14
15
16
17
18
19
20
21
22
23
24
25
26
27
28
29
30
31
32
33
34
35
36
37
38
39
40
41
42
43
44
45
46
47
48
49
50
51
52
53
54
55
56
57
58
59
60
61
62
63
64
65
66
67
68
69
70
71
72
73
74
75
76
77
78
79
80
81
82
83
84
85
86
87
88
89
90
91
92
93
94
95
96
97
98
99
100
101
102
103
104
105
106
107
108
109
110
111
112
113
114
115
116
117
118
119
120
121
122
123
124
125
126
127
128
129
130
131
132
133
134
135
136
137
这里可以看到遍历routes根据path和名name将每一个路由项处理为一个routerRecord,并且分类保存到pathMap和 nameMap,方便后续的匹配操作。
接下来,我们继续往下看vueRouter的构造函数。根据不同的模式生成history对象,那history对象到底是什么呢?我们接下去看History类。所有的History类都继承自基类base.js
export class History {
  router: Router; //router对象
  base: string;  //基准路径
  current: Route;  //当前的路由
  pending: ?Route;
  cb: (r: Route) => void;  //回调
  ready: boolean;
  readyCbs: Array<Function>;
  readyErrorCbs: Array<Function>;
  errorCbs: Array<Function>;

  // 子类实现
  +go: (n: number) => void;
  +push: (loc: RawLocation) => void;
  +replace: (loc: RawLocation) => void;
  +ensureURL: (push?: boolean) => void;
  +getCurrentLocation: () => string;

  constructor (router: Router, base: ?string) {
    this.router = router
    this.base = normalizeBase(base) //返回基准路径
    this.current = START //route 设置当前route
    this.pending = null
    this.ready = false
    this.readyCbs = []
    this.readyErrorCbs = []
    this.errorCbs = []
  }

  listen (cb: Function) {
    this.cb = cb
  }

  onReady (cb: Function, errorCb: ?Function) {
   //*****
  }

  onError (errorCb: Function) {
    //*****
  }

  //路由转化操作
  transitionTo (location: RawLocation, onComplete?: Function, onAbort?: Function) {
    const route = this.router.match(location, this.current) //找到匹配路由
    this.confirmTransition(route, () => { //确认是否转化
      this.updateRoute(route) //更新route
      onComplete && onComplete(route)
      this.ensureURL()

      // fire ready cbs once
      if (!this.ready) {
        this.ready = true
        this.readyCbs.forEach(cb => { cb(route) })
      }
    }, err => {
      if (onAbort) {
        onAbort(err)
      }
      if (err && !this.ready) {
        this.ready = true
        this.readyErrorCbs.forEach(cb => { cb(err) })
      }
    })
  }
  //确认是否转化路由
  confirmTransition (route: Route, onComplete: Function, onAbort?: Function) {
    const current = this.current
    const abort = err => {
      if (isError(err)) {
        if (this.errorCbs.length) {
          this.errorCbs.forEach(cb => { cb(err) })
        } else {
          warn(false, 'uncaught error during route navigation:')
          console.error(err)
        }
      }
      onAbort && onAbort(err)
    }
    //判断如果前后是同一个路由,不进行操作
    if (
      isSameRoute(route, current) &&
      route.matched.length === current.matched.length
    ) {
      this.ensureURL()
      return abort()
    }
    //下面是各类钩子函数的处理
    //*********************
    })
  }

  //更新路由
  updateRoute (route: Route) {
    const prev = this.current //跳转前路由
    this.current = route //装备跳转路由
    this.cb && this.cb(route) //回调函数,这一步很重要,这个回调函数在index文件中注册,会更新被劫持的数据 _router
    this.router.afterHooks.forEach(hook => {
      hook && hook(route, prev)
    })
  }
}
2
3
4
5
6
7
8
9
10
11
12
13
14
15
16
17
18
19
20
21
22
23
24
25
26
27
28
29
30
31
32
33
34
35
36
37
38
39
40
41
42
43
44
45
46
47
48
49
50
51
52
53
54
55
56
57
58
59
60
61
62
63
64
65
66
67
68
69
70
71
72
73
74
75
76
77
78
79
80
81
82
83
84
85
86
87
88
89
90
91
92
93
94
95
96
97
98
99
100
101
history/base.js实现了基本history的操作,history/hash.js,history/html5.js和history/abstract.js继承了base,只是根据不同的模式封装了一下几个函数的基本操作
  +go: (n: number) => void;
  +push: (loc: RawLocation) => void;
  +replace: (loc: RawLocation) => void;
  +ensureURL: (push?: boolean) => void;
  +getCurrentLocation: () => string;
2
3
4
5
可以看到有几个重要的操作函数,transitionTo对于路由更新的控制以及更新路由,updateRoute调用了我们在vue-router中注册的函数
 history.listen(route => {
      this.apps.forEach((app) => {
        app._route = route
      })
    })
2
3
4
5
这一步很重要,更新_route的值,还记得我们在install中做的操作
Vue.util.defineReactive(this, '_route', this._router.history.current)
劫持了_route对象,所里这里路由更新_route,导致了视图更新。
接下来,我们来看如何调用transitionTo,达到更新目的,transitionTo的调用都是在代码几个子类的实现里面
# 路由跳转函数
//hash.js
//设置路由,监控路由改变
export class HashHistory extends History {
  constructor (router: Router, base: ?string, fallback: boolean) {
    super(router, base)
    // check history fallback deeplinking检查历史回退深度链接
    if (fallback && checkFallback(this.base)) {
      return
    }
    ensureSlash()
  }
  setupListeners () {
    window.addEventListener('hashchange', () => {
      if (!ensureSlash()) {
        return
      }
      this.transitionTo(getHash(), route => {
        replaceHash(route.fullPath)
      })
    })
  }
 //push方法
  push (location: RawLocation, onComplete?: Function, onAbort?: Function) {
    this.transitionTo(location, route => {
      pushHash(route.fullPath)
      onComplete && onComplete(route)
    }, onAbort)
  }
  //replace方法
  replace (location: RawLocation, onComplete?: Function, onAbort?: Function) {
    this.transitionTo(location, route => {
      replaceHash(route.fullPath)
      onComplete && onComplete(route)
    }, onAbort)
  }
 }

  //html5.js实现

export class HTML5History extends History {
  constructor (router: Router, base: ?string) {
    super(router, base)

    const expectScroll = router.options.scrollBehavior //指回滚方式

    if (expectScroll) {
      setupScroll()
    }
    //监控popstate事件
    window.addEventListener('popstate', e => {
      const current = this.current
      this.transitionTo(getLocation(this.base), route => {
        if (expectScroll) {
          handleScroll(router, route, current, true)
        }
      })
    })
  }

  //push
   push (location: RawLocation, onComplete?: Function, onAbort?: Function) {
    const { current: fromRoute } = this
    this.transitionTo(location, route => {
      pushState(cleanPath(this.base + route.fullPath)) //保存当前的位置信息,用于返回时候复位
      handleScroll(this.router, route, fromRoute, false)
      onComplete && onComplete(route)
    }, onAbort)
  }

  replace (location: RawLocation, onComplete?: Function, onAbort?: Function) {
    const { current: fromRoute } = this
    this.transitionTo(location, route => {
      replaceState(cleanPath(this.base + route.fullPath)) //保存当前的位置信息,用于返回时候复位
      handleScroll(this.router, route, fromRoute, false)
      onComplete && onComplete(route)
    }, onAbort)
  }
}

  //abstract.js实现,这里通过栈的数据结构来模拟路由路径
 export class AbstractHistory extends History {
  index: number;
  stack: Array<Route>;

  constructor (router: Router, base: ?string) {
    super(router, base)
    this.stack = []
    this.index = -1
  }

  push (location: RawLocation, onComplete?: Function, onAbort?: Function) {
    this.transitionTo(location, route => {
      this.stack = this.stack.slice(0, this.index + 1).concat(route)
      this.index++
      onComplete && onComplete(route)
    }, onAbort)
  }

  replace (location: RawLocation, onComplete?: Function, onAbort?: Function) {
    this.transitionTo(location, route => {
      this.stack = this.stack.slice(0, this.index).concat(route)
      onComplete && onComplete(route)
    }, onAbort)
  }
}
2
3
4
5
6
7
8
9
10
11
12
13
14
15
16
17
18
19
20
21
22
23
24
25
26
27
28
29
30
31
32
33
34
35
36
37
38
39
40
41
42
43
44
45
46
47
48
49
50
51
52
53
54
55
56
57
58
59
60
61
62
63
64
65
66
67
68
69
70
71
72
73
74
75
76
77
78
79
80
81
82
83
84
85
86
87
88
89
90
91
92
93
94
95
96
97
98
99
100
101
102
103
104
105
这里,3种方式都提供了replace和push接口来更新路由同时hash模式监控 hashchange,H5模式监控 popstate
这里H5模式多了一步保存当前的位置信息,用于返回时候复位的操作
除了在子类调用之外,在 vueRouter类中init也有调用
if (history instanceof HTML5History) {
      history.transitionTo(history.getCurrentLocation())
    } else if (history instanceof HashHistory) {
      //建立hash监控
      const setupHashListener = () => {
        history.setupListeners()
      }
      history.transitionTo(
        history.getCurrentLocation(),
        setupHashListener,
        setupHashListener
      )
    }
}
2
3
4
5
6
7
8
9
10
11
12
13
14
因为在这两种模式下才有可能存在进入时候的不是默认页,需要根据当前浏览器地址栏里的 path 或者 hash 来激活对应的路由,此时就是通过调用 transitionTo 来达到目的
接着继续追踪replace和push的调用,这两个方法的触发通过我们定义的router-link组件
# router-link
render (h: Function) {
    const router = this.$router //路由对象
    const current = this.$route  //当前路由
    //解析 to的路径对应路由项
    const { location, route, href } = router.resolve(this.to, current, this.append)

    //设置一些默认元素class
    const classes = {}
    const globalActiveClass = router.options.linkActiveClass
    const globalExactActiveClass = router.options.linkExactActiveClass
    // Support global empty active class
    const activeClassFallback = globalActiveClass == null
            ? 'router-link-active'
            : globalActiveClass
    const exactActiveClassFallback = globalExactActiveClass == null
            ? 'router-link-exact-active'
            : globalExactActiveClass
    const activeClass = this.activeClass == null
            ? activeClassFallback
            : this.activeClass
    const exactActiveClass = this.exactActiveClass == null
            ? exactActiveClassFallback
            : this.exactActiveClass

    /**根据当前路由设置当前对象**/
    const compareTarget = location.path
      ? createRoute(null, location, null, router)
      : route
    // 如果严格模式的话 就判断是否是相同路由(path query params hash)
    // 否则就走包含逻辑(path包含,query包含 hash为空或者相同)
    classes[exactActiveClass] = isSameRoute(current, compareTarget)
    classes[activeClass] = this.exact
      ? classes[exactActiveClass]
      : isIncludedRoute(current, compareTarget)

    //事件处理函数
    const handler = e => {
      if (guardEvent(e)) {
        if (this.replace) {//路由replace触发改变router-view
          router.replace(location)
        } else {//路由push触发改变router-view
          router.push(location)
        }
      }
    }

    //事件对象
    const on = { click: guardEvent }
    if (Array.isArray(this.event)) {
      this.event.forEach(e => { on[e] = handler })
    } else {
      on[this.event] = handler
    }
   //添加元素的类
    const data: any = {
      class: classes
    }

    if (this.tag === 'a') {
      data.on = on
      data.attrs = { href }
    } else {
      // find the first <a> child and apply listener and href
      const a = findAnchor(this.$slots.default)
      if (a) {
        // in case the <a> is a static node
        a.isStatic = false
        const extend = _Vue.util.extend
        const aData = a.data = extend({}, a.data)
        aData.on = on
        const aAttrs = a.data.attrs = extend({}, a.data.attrs)
        aAttrs.href = href
      } else {
        // doesn't have <a> child, apply listener to self
        data.on = on
      }
    }

    return h(this.tag, data, this.$slots.default)
  }
}

function guardEvent (e) {
  // 忽略带有功能键的点击
  if (e.metaKey || e.altKey || e.ctrlKey || e.shiftKey) return
  // 已阻止的返回
  if (e.defaultPrevented) return
  // 右击
  if (e.button !== undefined && e.button !== 0) return
  // `target="_blank"` 忽略
  if (e.currentTarget && e.currentTarget.getAttribute) {
    const target = e.currentTarget.getAttribute('target')
    if (/\b_blank\b/i.test(target)) return
  }
   // 阻止默认行为 防止跳转
  if (e.preventDefault) {
    e.preventDefault()
  }
  return true
}

//找到第一个A标签
function findAnchor (children) {
  if (children) {
    let child
    for (let i = 0; i < children.length; i++) {
      child = children[i]
      if (child.tag === 'a') {
        return child
      }
      if (child.children && (child = findAnchor(child.children))) {
        return child
      }
    }
  }
}
2
3
4
5
6
7
8
9
10
11
12
13
14
15
16
17
18
19
20
21
22
23
24
25
26
27
28
29
30
31
32
33
34
35
36
37
38
39
40
41
42
43
44
45
46
47
48
49
50
51
52
53
54
55
56
57
58
59
60
61
62
63
64
65
66
67
68
69
70
71
72
73
74
75
76
77
78
79
80
81
82
83
84
85
86
87
88
89
90
91
92
93
94
95
96
97
98
99
100
101
102
103
104
105
106
107
108
109
110
111
112
113
114
115
116
可以看到router-link绑定了click 方法调用replace和push 达到更新路由目的。
最后,我们来看router-view如何是如何更新的
# router-view
export default {
  name: 'router-view',
  functional: true, // 功能组件 纯粹渲染
  props: {
    name: {
      type: String,
      default: 'default'
    }
  },
  render (_, { props, children, parent, data }) {
    //标记为routerview
    data.routerView = true

    // directly use parent context's createElement() function
    //直接使用父组件上下文的createElement()函数
    // so that components rendered by router-view can resolve named slots
    const h = parent.$createElement
    const name = props.name
    const route = parent.$route
    const cache = parent._routerViewCache || (parent._routerViewCache = {}) //缓存

    // determine current view depth, also check to see if the tree
    // has been toggled inactive but kept-alive.
    let depth = 0
    let inactive = false
    //解决router-view 嵌套问题
    while (parent && parent._routerRoot !== parent) {
      if (parent.$vnode && parent.$vnode.data.routerView) {
        depth++
      }
      //是否是keep-alive
      if (parent._inactive) {
        inactive = true
      }
      parent = parent.$parent
    }
    //当前view-router的嵌套深度
    data.routerViewDepth = depth

    // render previous view if the tree is inactive and kept-alive
    if (inactive) {
      return h(cache[name], data, children)
    }
    // 得到相匹配的当前组件层级的 路由记录
    const matched = route.matched[depth]
    // render empty node if no matched route
    if (!matched) {
      cache[name] = null
      return h()
    }

    //缓存组件
    const component = cache[name] = matched.components[name]

    // attach instance registration hook
    // this will be called in the instance's injected lifecycle hooks
    data.registerRouteInstance = (vm, val) => {
      // val could be undefined for unregistration
      const current = matched.instances[name]
      if (
        (val && current !== vm) ||
        (!val && current === vm)
      ) {
        matched.instances[name] = val
      }
    }

    // also register instance in prepatch hook
    // in case the same component instance is reused across different routes
    ;(data.hook || (data.hook = {})).prepatch = (_, vnode) => {
      matched.instances[name] = vnode.componentInstance
    }

    // resolve props
    data.props = resolveProps(route, matched.props && matched.props[name])

    return h(component, data, children)
  }
}
2
3
4
5
6
7
8
9
10
11
12
13
14
15
16
17
18
19
20
21
22
23
24
25
26
27
28
29
30
31
32
33
34
35
36
37
38
39
40
41
42
43
44
45
46
47
48
49
50
51
52
53
54
55
56
57
58
59
60
61
62
63
64
65
66
67
68
69
70
71
72
73
74
75
76
77
78
79
可以看到逻辑还是比较简单的,根据route拿到匹配的组件进行渲染就可以了。里面比较复杂的是对于组件的缓存处理。
# 总结一下
这里,整个流程就完全走完了。可能还有些懵,我们下面就在总结一下整个流程。
- 1、安装插件
完成了router-link和 router-view 两个组件的注册,router-link用于触发路由的变化,router-view作为功能组件,用于触发对应路由视图的变化
混入beforeCreate生命周期处理,初始化_routerRoot,_router,_route等数据
全局设置VUE静态访问$router和$route,方便后期访问
2、根据路由配置生成router实例
根据配置数组生成路由配置记录表
生成监控路由变化的hsitory对象
3、将router实例传入根VUE实例
根据beforeCreate混入,为根vue对象设置了劫持字段_route,用户触发router-view的变化
调用init()函数,完成首次路由的渲染,首次渲染的调用路径是 调用history.transitionTo方法,根据router的match函数,生成一个新的route对象,接着通过confirmTransition对比一下新生成的route和当前的route对象是否改变,改变 的话触发updateRoute,更新hsitory.current属性,触发根组件的_route的变化,从而导致组件的调用render函数,更新router-view。
另外一种更新路由的方式是主动触发,router-link绑定了click方法,触发history.push或者history.replace,从而触发history.transitionTo
同时会监控hashchange和popstate来对路由变化作对用的处理
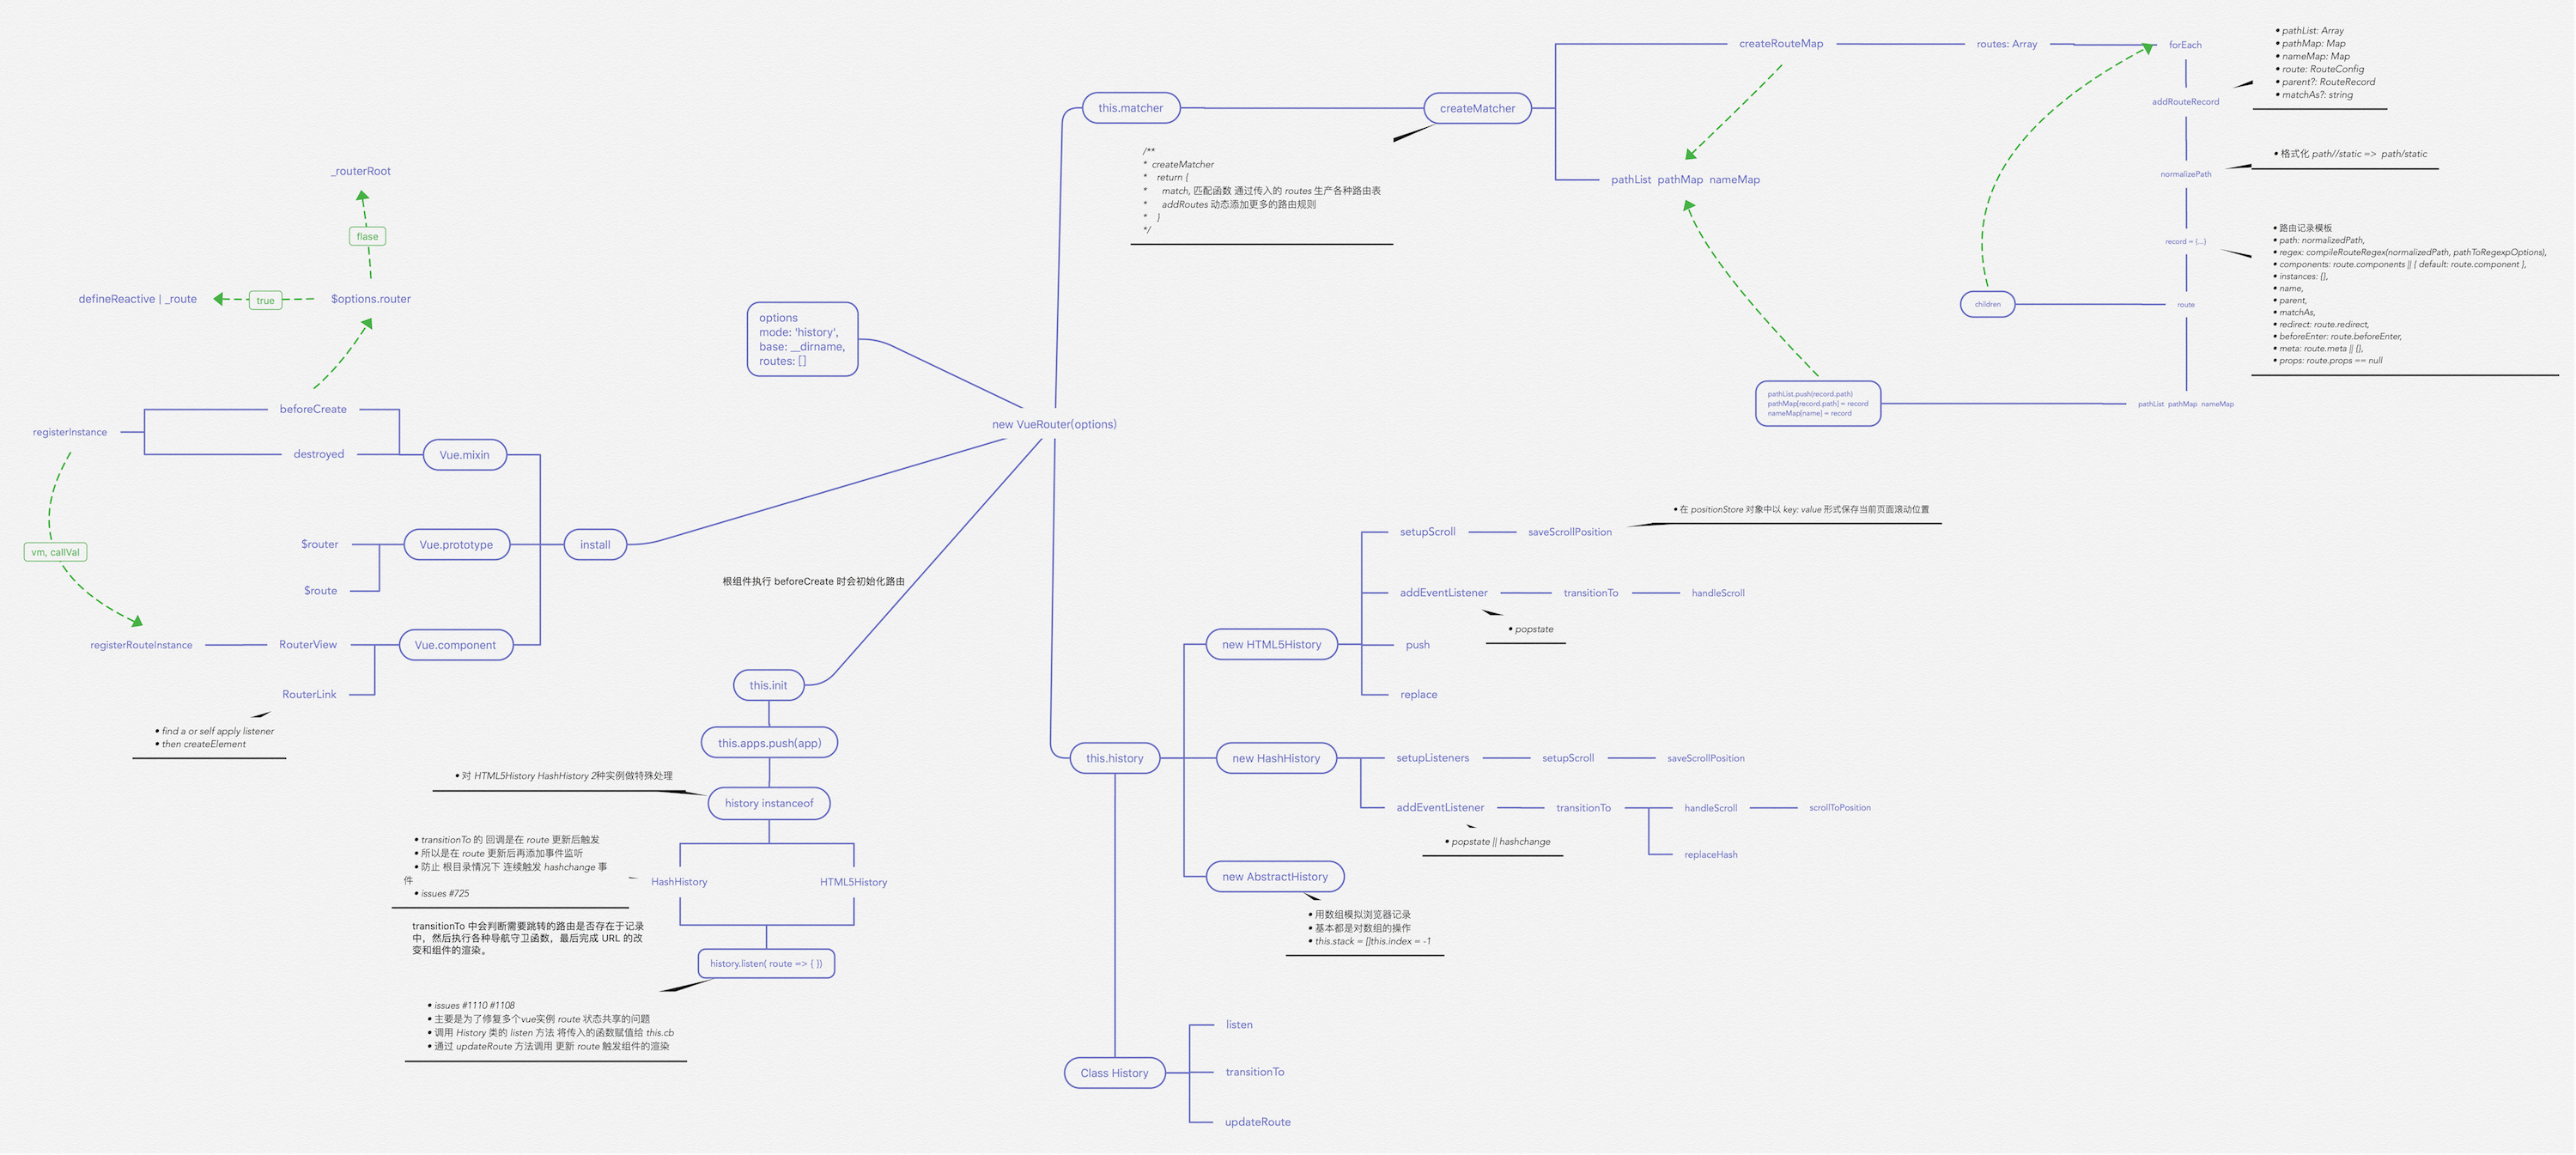
# 重要函数思维导图
以下思维导图罗列了源码中重要的一些函数